|
Specifications: Spara i minneslistan Method of operation: Package includes: Note: Betalning: Leverans: Features:
Because the person who will get this cell phone case do not want something that is too conspicuous and the function is really just to protect it from scratches I decided to make it in wool felt. – Fästa filten på mellanlägget i brodérbågen.
Well, now it is only this day left in 2013 - and what did you like best of my blog posts? Judging by the number of readers, it was these projects. To be honest some of these, were also my favorites along with the ones I showed in yesterday's blog post.
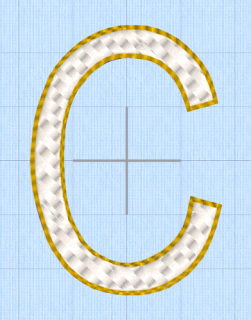
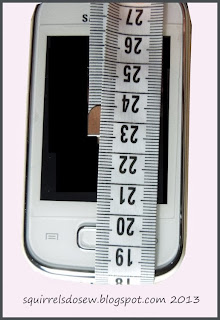
Tomtarna till jul som jag gjort som ett ”in-the-hoop” projekt. I ullfilt och lammull så känns de både ”gammaldags och moderna”. 5. Embroider the motif. Remove the embroidered wool felt from the hoop. 1. Start by measuring the circumference of the mobile case. Both the width and height. Cut out two pieces of wool felt spelautomater online athens, each with a margin to cover half of the measure. 5. Brodera motivet. Ta bort den broderade ullfilten ur bågen. – Get the straight lines that I can then use to measure the dimension of the mobile case. 2. Make one letter or motif in your Embroidery Software. I have used my 6 D Design Creator to create one letter with a special filler pattern and a triple Running Stich contour. Of course, you can make an appliqué of a letter with a different color of felt or embroider by hand if you do not have an embroidery machine or Embroidery Software. Felt buttons made from circles created in Embroidery Software. So simple to make besta casino 021, yet so impactful. One might make a brooch if you put together some and decorated with a few leaves. Halsbandet också det gjort i ullfilt – ett material jag jobbat med väldigt mycket i år. 7. Nåla ihop fram och bakstycke. The Santa’s for Christmas as I have done as an "in-the-hoop" projects. In wool felt and lambs wool enarmad bandit wood, they feel both "old-fashioned and modern".
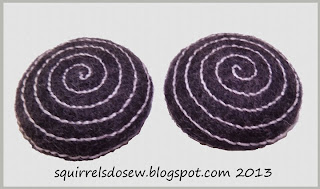
The necklace also is done in wool felt - a material I've worked with a lot this year. Filtknappar där jag använt mig av cirklar gjorda i Embroidery Software. Så enkla att göra och samtidigt så effektfulla. Man skulle kanske kunna göra en brosch om man satte samman några och dekorerade med några blad…
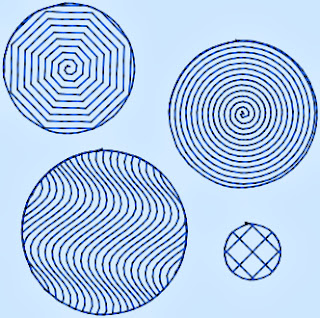
Here you can see a plain standard fill – with triple stitch outlines. Du behöver inte göra projekt som tar evigheter att slutföra. En enda bokstav på något kan vara fullt tillräckligt - och faktiskt ganska vackert.
But what different it looks with another fill pattern. Like braided ribbons.
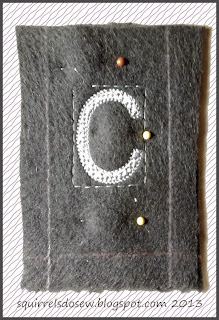
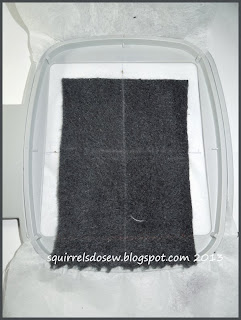
Now there are two days left of this year. Another Blog year has passed and I've done a lot of fun things and also put up a lot of tutorials that I hope you have tried and enjoyed. So here in the last few days I thought to look back and show you some of my favorites, but also what you liked the most, i.e. the posts that have had the most readers. But first some of my favorites – well, some of your favorites are my favorites as well… The next time I'll show how the case is sewn together and how any adjustments are made. Eftersom den som ska få detta mobilfodral inte vill ha något som är alltför iögonfallande och funktionen egentligen bara är för att skydda den från repor så beslutade jag att göra den i ullfilt. If you want to do something that makes it "a bit more" you can just change the fill pattern and the angle of it. Here I have "played" a little in 6 D Design Creator. Nästa gånga ska jag visa hur fodralet sys ihop och hur eventuella justeringar görs. 6. Draw lines for the measurements you have with a chalk pen. Add a few millimeters extra width and do not cut anything outside the drawn lines yet. When you have drawn the lines you can remove the stabilizer. It is wise though to save the basting stitch line. 3. Spänn mellanlägg i en broderbåge och placera filtbiten på den. Jag har dragit linjer av krita för att få en placering som gör att jag senare har lite marginal vid placering och montering av fodralet. 4. När jag broderade mitt C så gjorde jag en tråckelsömsram runt bokstaven av två skäl: 3. Hoop stabilizer in an embroidery hoop and place the felt piece on it. I have drawn lines of chalk to get a position that allows me later to have a little margin to the placement and assembly of the case.
– Få raka linjer som jag sedan kan använda för att mäta ut måttet på mobilfodralet. 4. When I embroidered my C I did a basting stitch border around the letter for two reasons: – Attaching fabric to the stabilizer in the hoop. You don’t have to do projects that take for ages to complete. A single letter on something can be quite enough – and in fact quite beautiful. Ja, så var det bara denna dag kvar på 2013 – och vad gillade ni bäst av mina blogginlägg? Att döma av antalet läsare så var det dessa projekt. För att vara ärlig så var även vissa av dessa mina favoriter tillsammans med de jag visade i gårdagens inlägg. A simpler than simplest cellphone case in Wool Felt 1. Börja med att mäta omkretsen på mobilfodralet. Både på bredden och höjden. Klipp ut två bitar av ullfilt som vardera med marginal täcker hälften av måttet. 7. Pin the front side with the reverse side. Om du vill göra något som gör det ”lite mer” kan du bara ändra fyllnadsmönstret och vinkeln på det. Här har jag "lekt" lite i 6 D Design Creator. Hur man gör cirklar var också några av de mer populära inläggen. Men vad annorlunda det ser ut med ett annat fyllnadsmönster. Liksom flätade band.
Att använda en yo-yo maker till att klä knappar är också en användbar sak. 6. Rita linjer efter de mått du har med en kritpenna. Ta till någon millimeter extra bredden och klipp inte av något utanför de ritade linjerna ännu. När du ritat linjerna kan du ta bort mellanlägget. Det kan dock vara bra att spara tråckelsömsramen. 6 D Design Creator is part of 6 D Premier from Husqvarna Viking 2. Gör en bokstav eller annat motiv i ditt Embroidery Software. Jag har använt mitt 6 D Design Creator för att skapa en bokstav med en speciell fyllnadsyta samt en tredubbel Running Stich kontur. Naturligtvis kan du göra en applikation av en bokstav med en annan färg av filt eller brodera för hand om du inte har en brodérmaskin eller Embroidery Software.
Här ser du en vanlig standardfyllning - med trippel raksömskontur.
0 Comments
Leave a Reply. |


 RSS Feed
